North Scorecard
North Scorecard
| Hole | 1 | 2 | 3 | 4 | 5 | 6 | 7 | 8 | 9 |
| Yds Par |
510 5 |
130 3 |
335 4 |
289 4 |
150 3 |
301 4 |
431 4 |
416 4 |
535 5 |
| Yds Par |
510 5 |
130 3 |
335 4 |
289 4 |
150 3 |
301 4 |
431 4 |
416 4 |
535 5 |
| Yds Par |
450 5 |
100 3 |
335 4 |
261 4 |
110 3 |
301 4 |
390 4 |
416 5 |
499 5 |
| Yds Par |
450 5 |
100 3 |
335 4 |
261 4 |
110 3 |
301 4 |
390 4 |
416 5 |
499 5 |
| Handicap | 6 | 18 | 12 | 10 | 16 | 14 | 4 | 8 | 2 |
| Hole | 10 | 11 | 12 | 13 | 14 | 15 | 16 | 17 | 18 |
| Yds Par |
445 4 |
120 3 |
539 5 |
403 4 |
150 3 |
502 5 |
368 4 |
312 4 |
400 4 |
| Yds Par |
445 4 |
120 3 |
539 5 |
403 4 |
150 3 |
502 5 |
368 4 |
312 4 |
400 4 |
| Yds Par |
445 5 |
90 3 |
489 5 |
399 4 |
105 3 |
451 5 |
368 4 |
312 4 |
350 4 |
| Yds Par |
445 5 |
90 3 |
489 5 |
399 4 |
105 3 |
451 5 |
368 4 |
312 4 |
350 4 |
| Handicap | 1 | 17 | 3 | 7 | 15 | 5 | 11 | 13 | 9 |
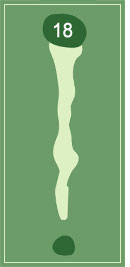
1
| Tee | Yardage | Par | Handicap |
|---|---|---|---|
| Blue | 510 | 5 | 6 |
| White | 510 | 5 | 6 |
| Yellow | 450 | 5 | 6 |
| Red | 450 | 5 | 6 |
The first hole at the North starts off with a tradition that began many years ago: a large oak tree right in the middle of the fairway. It doesn’t come into play off the tee, but this is one par five that you’d rather approach from the right or left rough than the middle of the fairway!
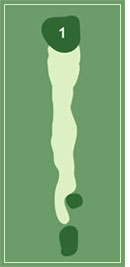
2
| Tee | Yardage | Par | Handicap |
|---|---|---|---|
| Blue | 130 | 3 | 18 |
| White | 130 | 3 | 18 |
| Yellow | 100 | 3 | 18 |
| Red | 100 | 3 | 18 |
Despite its short length, this par three doesn’t give out many birdies. The green is elevated with a sharp drop off leading to a creek just 10 paces past the pin. Club selection is key on this hole because the only safe place to miss the green is short and right.
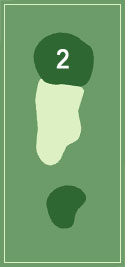
3
| Tee | Yardage | Par | Handicap |
|---|---|---|---|
| Blue | 335 | 4 | 12 |
| White | 335 | 4 | 12 |
| Yellow | 335 | 4 | 12 |
| Red | 335 | 4 | 12 |
This hole can be looked at in one of two ways: straight and simple, or “Oh no, the dogleg is in play.” There is a split fairway on this hole, so it has two very different personalities. The straight hole is of medium length, and the only obstacles from tee to green are a couple of hills. The dogleg plays long. After rounding the corner 215 yards out, you’re left with a 200-yard approach to a well contoured green that is closely guarded in front by a meandering stream. Good luck!
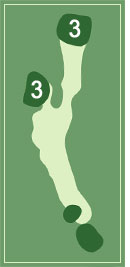
4
| Tee | Yardage | Par | Handicap |
|---|---|---|---|
| Blue | 289 | 4 | 10 |
| White | 289 | 4 | 10 |
| Yellow | 261 | 4 | 10 |
| Red | 261 | 4 | 10 |
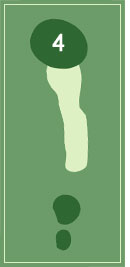
The fourth hole doesn’t favor the left to right shot. Large trees surround the three tee boxes on this hole and border the entire right side. The best way to attack this hole is to not hit your drive too far. If you hit it over the hill that ends about 100 yards short of the green, you’ll be left with a blind shot from the valley to a very deceiving green. The shorter club off the tee will help you keep it out of the trees, too.
5
| Tee | Yardage | Par | Handicap |
|---|---|---|---|
| Blue | 150 | 3 | 16 |
| White | 150 | 3 | 16 |
| Yellow | 110 | 3 | 16 |
| Red | 110 | 3 | 16 |
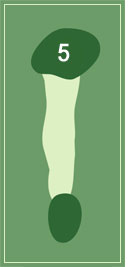
The fifth hole is a 150-yard par three from an elevated tee box. If you hit it over the green here, it might roll a little farther than you like, and the shot coming back will be to a green that is sloping away from you. From this tee box, you get the first glimse of our south course across the highway.
6
| Tee | Yardage | Par | Handicap |
|---|---|---|---|
| Blue | 301 | 4 | 14 |
| White | 301 | 4 | 14 |
| Yellow | 301 | 4 | 14 |
| Red | 301 | 4 | 14 |
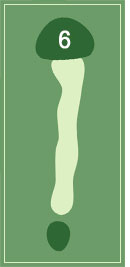
The sixth is a must birdie. It is marked 301 yards, but it plays shorter. The green is not visible from the tee, but anything long enough will funnel right down toward the middle. Don’t be caught snoozing because of the benign appearance of this green. It has a tricky slope from left to right and front to back, so judge your approach accordingly.
7
| Tee | Yardage | Par | Handicap |
|---|---|---|---|
| Blue | 431 | 4 | 4 |
| White | 431 | 4 | 4 |
| Yellow | 390 | 4 | 4 |
| Red | 390 | 4 | 4 |
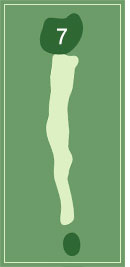
This hole stole the length that its predecessor lacked. The 431-yard dogleg right is bordered by mature trees on both left and right. Don’t be tempted to hug the corner of this dogleg, or you’ll end up in the woods. The ideal approach is from the left half of the fairway.
8
| Tee | Yardage | Par | Handicap |
|---|---|---|---|
| Blue | 416 | 4 | 8 |
| White | 416 | 4 | 8 |
| Yellow | 416 | 5 | 8 |
| Red | 416 | 5 | 8 |
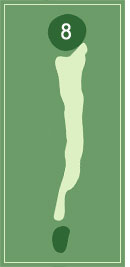
The eighth is another long par four. If you can hit it long and straight, this hole should present no problems. Although, you may have a side or uphill lie when shooting at this small green.
9
| Tee | Yardage | Par | Handicap |
|---|---|---|---|
| Blue | 535 | 5 | 2 |
| White | 535 | 5 | 2 |
| Yellow | 499 | 5 | 2 |
| Red | 499 | 5 | 2 |
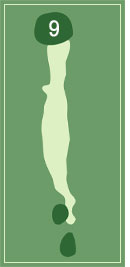
This is the longest and one of the most challenging holes on the course. It is a 535-yard dogleg right par five. There isn’t a level spot from tee to green, leaving many difficult lies. There is a creek that comes into play on the second shot, which presents a question. Lay up and have an uphill 200-yard approach to a very small putting surface, or go for it, leaving a side hill or blind third shot. Either way, this hole will test your skills, if not your patience.
10
| Tee | Yardage | Par | Handicap |
|---|---|---|---|
| Blue | 445 | 4 | 1 |
| White | 445 | 4 | 1 |
| Yellow | 445 | 5 | 1 |
| Red | 445 | 5 | 1 |
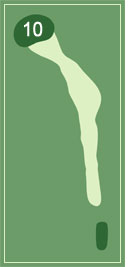
Try to avoid starting your round on the back nine because number ten is the toughest hole on the course. It’s a 445-yard par four with an elevated undulating green and a creek 280 yards off the tee. Be happy with a bogey on this one, in fact the women play it as a par five.
11
| Tee | Yardage | Par | Handicap |
|---|---|---|---|
| Blue | 120 | 3 | 17 |
| White | 120 | 3 | 17 |
| Yellow | 90 | 3 | 17 |
| Red | 90 | 3 | 17 |
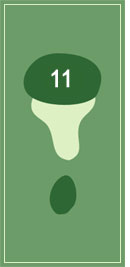
Eleven is the shortest hole on the course, but you better hope to knock it close because this is our most severely sloped green. This hole looks shorter than it plays because of the large valley between tee and green.
12
| Tee | Yardage | Par | Handicap |
|---|---|---|---|
| Blue | 539 | 5 | 3 |
| White | 539 | 5 | 3 |
| Yellow | 489 | 5 | 3 |
| Red | 489 | 5 | 3 |
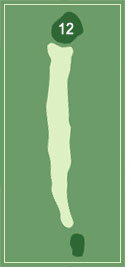
This par five has out of bounds running up the entire left side and a creek 180-yards off the tee. The creek is too wide to carry on your tee shot, so the required lay up makes this hole play long.
13
| Tee | Yardage | Par | Handicap |
|---|---|---|---|
| Blue | 403 | 4 | 7 |
| White | 403 | 4 | 7 |
| Yellow | 399 | 4 | 7 |
| Red | 399 | 4 | 7 |
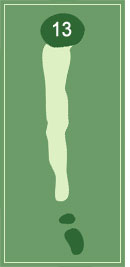
This hole borders Route two and thus has out of bounds along the entire left side. Your tee shot here comes out of a chute of large trees to a generous fairway. The second shot must be accurately placed on the elevated green with out of bounds left and a steep drop off to the right.
14
| Tee | Yardage | Par | Handicap |
|---|---|---|---|
| Blue | 150 | 3 | 15 |
| White | 150 | 3 | 15 |
| Yellow | 105 | 3 | 15 |
| Red | 105 | 3 | 15 |
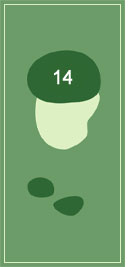
Fourteen is a very picturesque par three measuring 150-yards. It plays downhill from tee to green, and the green has a substantial back to front grade. You don’t want to be above the hole on this one!
15
| Tee | Yardage | Par | Handicap |
|---|---|---|---|
| Blue | 502 | 5 | 5 |
| White | 502 | 5 | 5 |
| Yellow | 451 | 5 | 5 |
| Red | 451 | 5 | 5 |
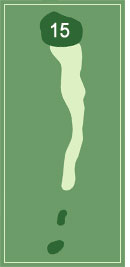
Birdie is a definite possibility on this fairly short par five. There is a large valley running through the middle of the hole that you should stay out of if you would like to see the green on your second shot. To do this, keep your tee shot to the left, and you might have a chance to hit it home in two!
16
| Tee | Yardage | Par | Handicap |
|---|---|---|---|
| Blue | 368 | 4 | 11 |
| White | 368 | 4 | 11 |
| Yellow | 368 | 4 | 11 |
| Red | 368 | 4 | 11 |
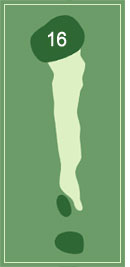
This hole, like it’s neighbor the twelfth, requires a lay up off the tee. There is a creek running through the fairway 220-yards out. You don’t want to hit your tee shot any longer than 180-yards so that you aren’t hitting uphill to this small, elevated green.
17
| Tee | Yardage | Par | Handicap |
|---|---|---|---|
| Blue | 312 | 4 | 13 |
| White | 312 | 4 | 13 |
| Yellow | 312 | 4 | 13 |
| Red | 312 | 4 | 13 |
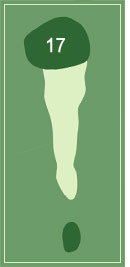
This hole is short and sweet. It plays a little over 300 yards, but the fairway is quite narrow. The fairway is sloped left to right near the green, so favor the left side.
18
| Tee | Yardage | Par | Handicap |
|---|---|---|---|
| Blue | 400 | 4 | 9 |
| White | 400 | 4 | 9 |
| Yellow | 350 | 4 | 9 |
| Red | 350 | 4 | 9 |
The eighteenth is a 400-yard par four. The bigger hitters will have a mound to contend with that can bounce a slightly off center tee shot into the trees. Most people will be happy to hit it onto the level valley floor, but the mound will block your view of this tricky green.
